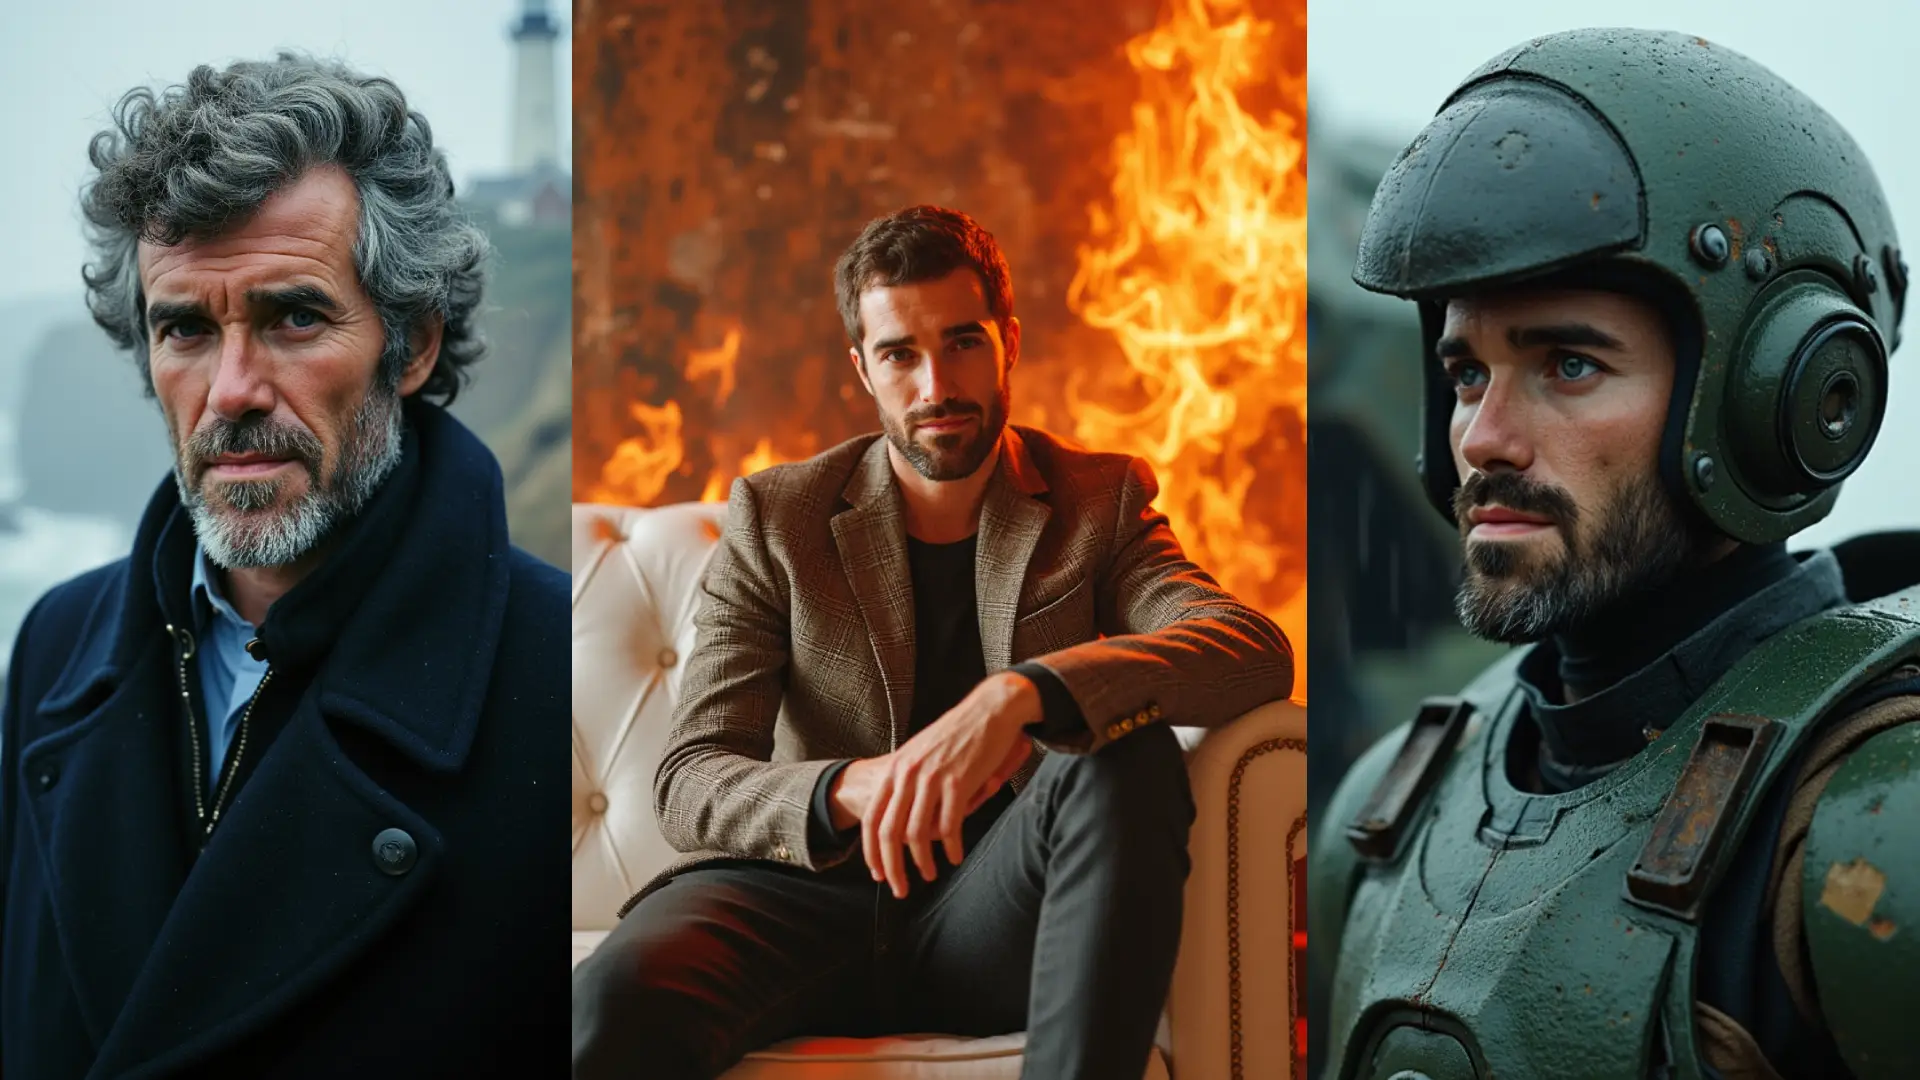
Before diving into the how-to guide, I must express my surprise at the quality of FLUX-trained LoRAs. They closely match physical features in most cases and are flexible and easy to prompt—more so than those trained with Stable Diffusion 1.5.
Training the LoRA for Flux
Dataset preparation
Collecting images
FLUX LoRAs seem to require fewer images for effective learning. For this project, I experimented with 25–27 images for myself and Violeta, whereas for Stable Diffusion 1.5, I used 70 and 200 images, respectively.
When using a smaller set of images, make sure to cover a broad range of shots, angles, poses, and expressions. This variety is essential for the model to learn your core facial and body structure effectively. For further guidance on how to sample the data, check the previous post: Training a LoRa of your face with Stable Diffusion 1.5.
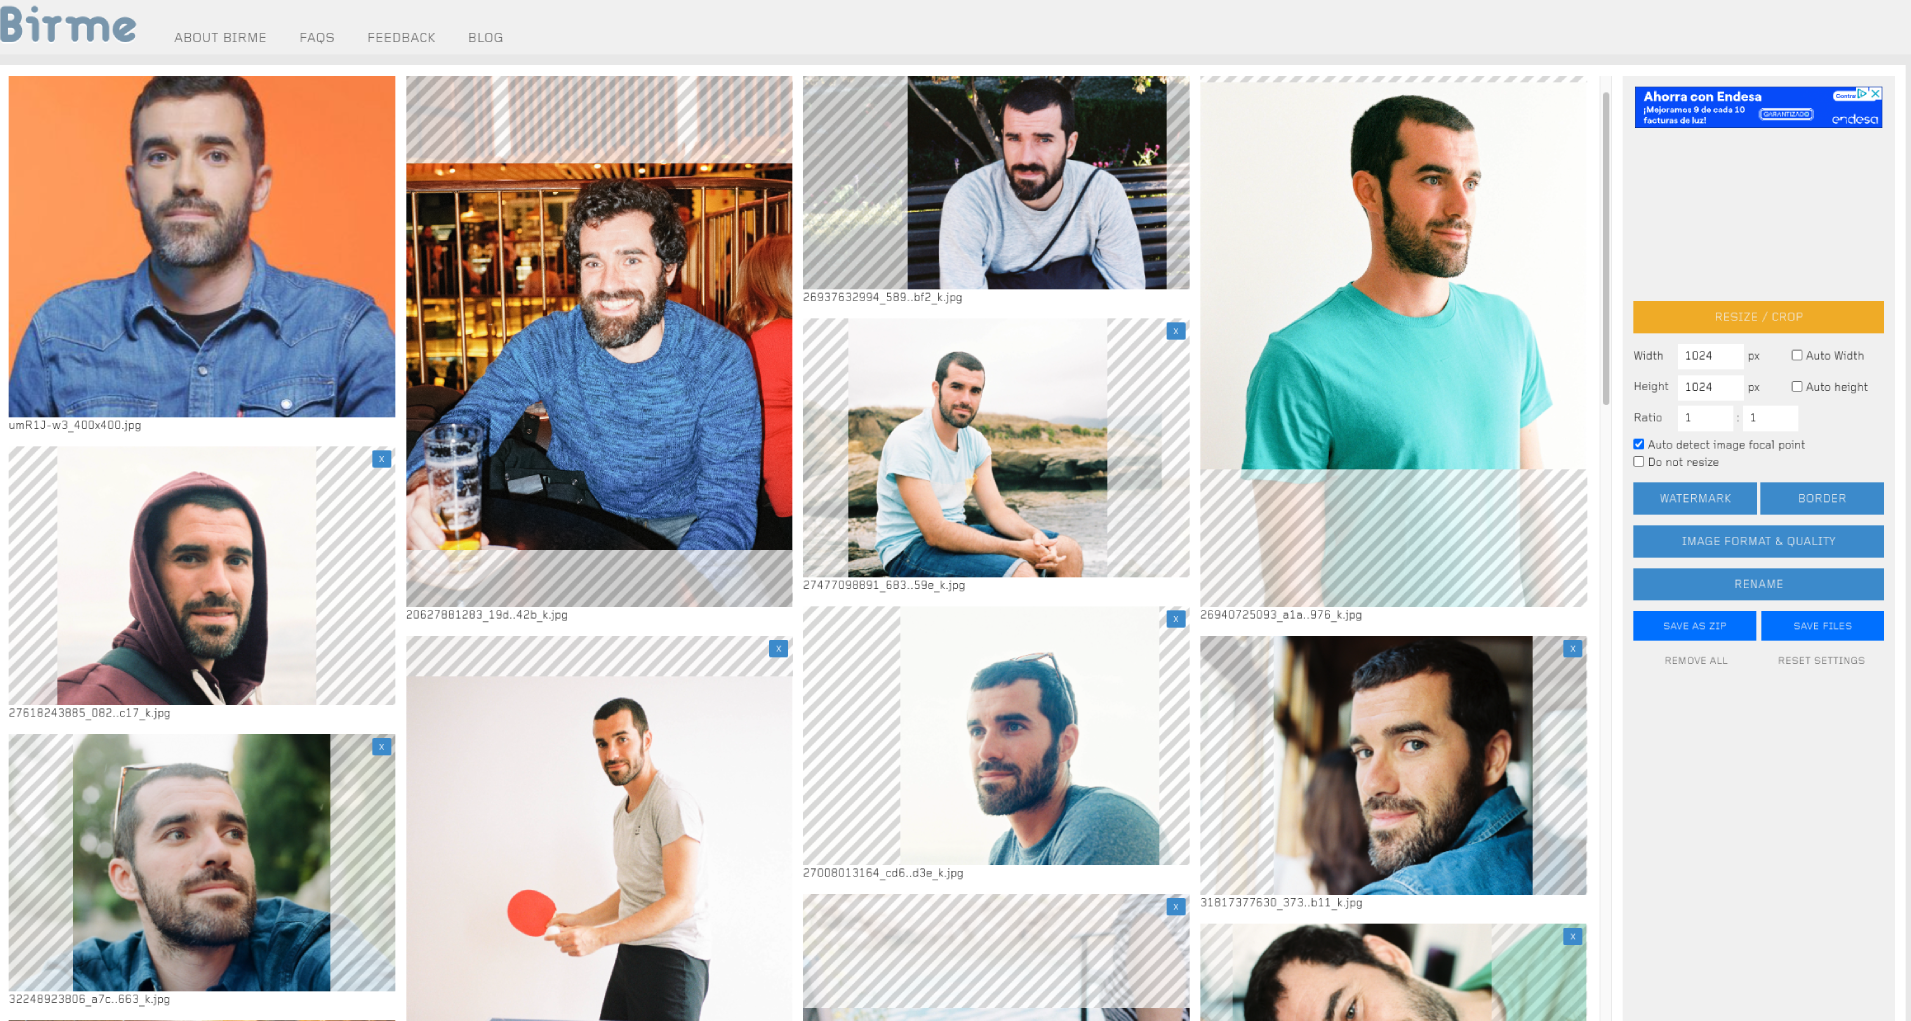
Processing Images
I found some conflicting advice on how to best prepare images for FLUX. However, I followed the mainstream recommendation to use square images. For Stable Diffusion 1.5, I resized and cropped the images to 512x512, but for FLUX, I doubled the resolution to 1024x1024, using the free online tool Birme to crop them.
I haven’t tested other aspect ratios yet, but the documentation suggests no issue with varying aspect ratios: “You do not need to crop/resize your images. The loader will automatically resize them and can handle varying aspect ratios.”
Remember that the only supported formats are .jpg, .jpeg, and .png—so avoid using .webp files for now.
Captioning
Captions are more important for FLUX.1-dev than for Stable Diffusion 1.5. Although I could have used Kohya’s utilities with a BLIP-based captioner, I opted for a more powerful solution due to the critical role of captions in this model.
I wrote a python script to send requests to Google Cloud Platform’s multimodal Gemini Pro model, which is highly accurate in generating context-specific captions. Make sure to include a trigger word to activate the LoRA. Use an uncommon word to avoid conflicts with other concepts; I chose pelarbues as my trigger word.
I reviewed each caption to ensure they provided details on clothing and accessories while avoiding non-interchangeable features like eye color, hair, and face shape.
Prompt
Generate a caption of the image consider the gender to use the correct subject. Start the caption with the following word: pelarbuesThen continue the caption following this template:, [type of image] of a [subject description] with [hair description] and [clothing description]. He/she is [action/pose] in [background description].Describe his/her [facial expression/eye description]. [Additional details if needed]. [Camera and Lighting]. Example:Trigger Word, A photo of a young woman with curly brown hair tied in a ponytail, wearing a red hoodie and blue jeans. She is sitting on a park bench with autumn leaves scattered around. Her green eyes are looking directly at the camera, with a relaxed smile. back view, soft lighting, natural background, DSLR photo, autumn ambiance. Here’s a breakdown of the main elements: 1. Trigger Word: Specify the type of image (photo, render, painting). 2. Subject Description: Specify Age, gender, hair style, and color. Do not include color of the eyes. 3. Clothing Description: Specify clothes, accessories. 4. Action/Setting: Where the person is, their pose or actions. 5. Facial Expression: Describe their face, eyes, and mouth. 6. Environment: Include details about the background or surroundings. 7. Camera and Lighting: Add specifics about the camera shot (closeup, medium shot, cowboy shot...), angle (eye level shot, low angle, high angle...), lighting (natural, flash, backlight...), camera focus (focus full, shallow focus, deep focus...) and medium (analog, digital).
For consistency, ensure each caption follows a similar structure. Using an LLM to write the captions also helps maintain consistency, which seems to be important according to this Reddit thread. Remember to thoroughly review and edit any auto-generated captions to prevent errors from affecting the training.
Some LoRA trainers claim that even a single poorly captioned image can impact model performance. Hence, curate a varied dataset with high-quality captions to ensure success.
Preparing the image folder
Training the LoRA on Replicate is more straightforward than doing it locally, so I highly recommend it—even for those with technical expertise. The scripts are based on the ai-toolkit project by @ostris.
According to the ai-toolkit documentation:
“Once you have your images, ensure you save the captions in .txt files named to match each image. For example, image1.jpeg should have a corresponding image1.txt file containing the caption.”
Replicate also offers a captioning option using the Llava 1.5 model, which performs quite well, but I preferred to have more control over the process. Once your images and captions are ready, bundle them into a zip file and upload it to Replicate.
I’ve conducted several experiments varying the number of images, training steps, and captions. For a quite successful experiment I have used the following params.
Let me explain them briefly and share what have worked best for me so far:
Limit the number of images to 30 or fewer: When I included 40–50 images, the LoRA seemed to lose its focus on the subject.
Aim for at least 40 steps per image: For example, 26 images would require a total of 1,040 steps (26x40). This helps the model better learn the subject.
Keep learning rate at 0,0004
Network dimensions: I’ve used dimensions up to 32. If you’re working with more complex concepts, consider using 64 or even 128 dimensions. I plan to test these in future experiments, but I’m currently happy with the results at 32.
Selective layer training: Recently, AI consultant TheLastBen shared on Twitter that it’s not necessary to train all layers of a LoRA. Instead, you can focus on just a few layers, leading to a much smaller model. I tested training all layers versus a few select layers (7, 12, 16, and 20), and found that training only those four yielded a significantly better LoRA. thelastben even suggests that only the 7th and 20th layers may be necessary, so it might be worth experimenting with. The benefit of limiting layers is that it makes the LoRA lighter, increasing both inference speed and reducing costs. The rationale for this approach is discussed in detail in this paper: Extending Transformer layers as Painters to DiT’s.
Cost on Replicate
The parameters discussed above, such as the number of steps, dimensions, and selected layers, offer flexibility in experimenting with different hyperparameters. Each experiment costs a couple of dollars—not a huge expense, but enough to encourage thoughtful testing.
Searching for optimal hyperparameters is a classic Data Science problem, requiring test batteries and careful observation of how parameter settings affect results. While best practices suggest thorough testing, my approach has been more exploratory and relaxed—focusing on a “good enough” solution while having fun.
Prediction Time: Generate images of yourself
As mentioned earlier, I haven’t yet set up my MacBook to run FLUX on the Apple Silicon chip. However, you can download the trained LoRA weights and use them on other machines. Whenever I want to use my LoRAs, I typically access them through the API in Python. However, I mostly rely on the playground, which is quite convenient since it allows me to generate images directly from my smartphone.
The model runs on H100 hardware, costing $0.001528 per second. While it’s affordable for personal use, you likely don’t need such a powerful machine for this purpose. Running the model on a personal computer with a GPU or on more affordable hardware is usually more practical. The pay-per-time format is convenient for me, but I make sure to set monthly expense limits.
Tips for Inference (With Examples)
Prompts play a crucial role in generating quality images. One of the advantages of FLUX over SD1.5 is that it’s much easier to prompt. While the process is still somewhat nuanced, FLUX tends to stick to instructions more reliably, making it quicker to learn and achieve desired results.
For my prompts, I aim to keep them quite detailed. I refine them using ChatGPT, which adds an extra level of structure and makes them more natural, rather than just concatenating tags separated by commas.
Let me share a couple of examples:
Prompt
A captivating, photorealistic image with RAW quality, cinematic grain, and eye-catching light. The scene features an analog portrait of 37 year old pelarbues, short dark hair, short beard, from 1966, retro charm. He wears vibrant, psychedelic attire. Posing confidently in a lush green field, surrounded by colorful wildflowers, his smile and gaze exude an irresistible allure. This image perfectly captures the essence of 1960s counterculture, blending nostalgia with timeless beauty. The shoot features vibrant colors, hyper-detailed dynamic style
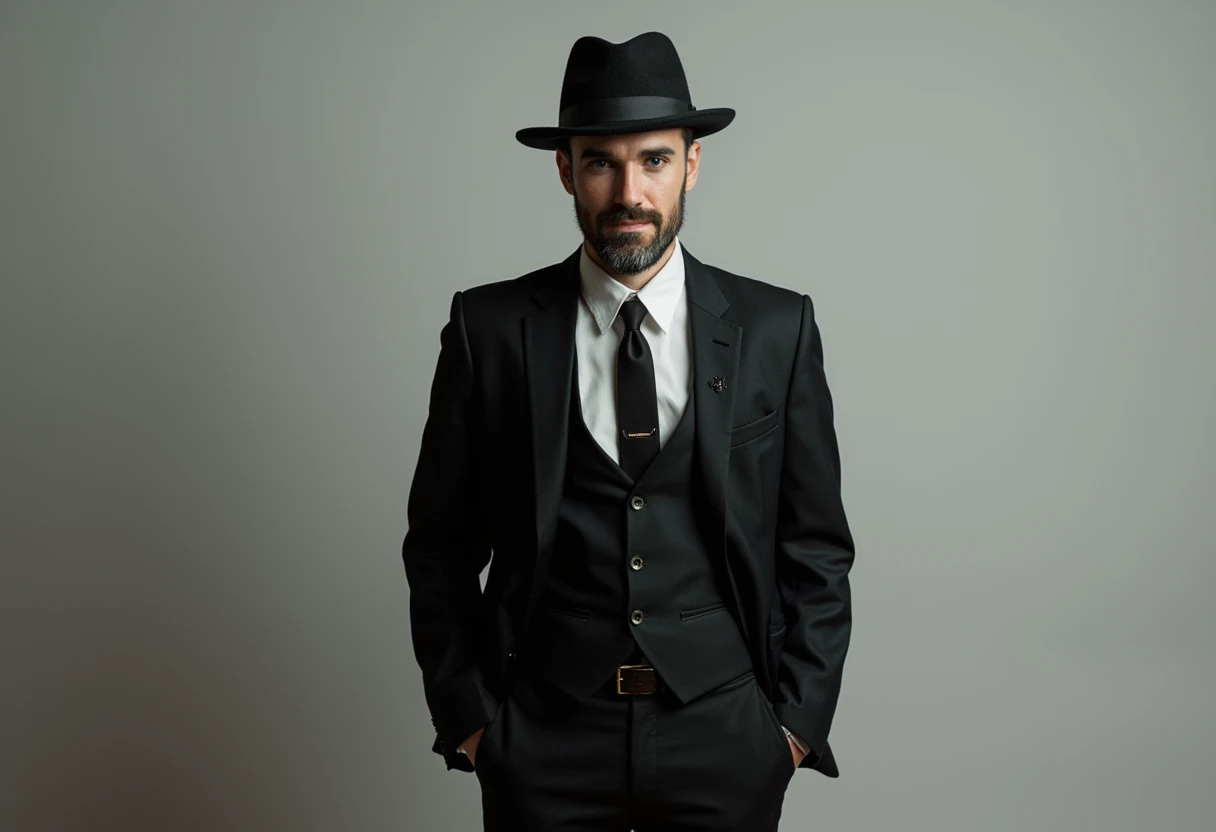
Prompt
An analog portrait of a 40-year-old Pelarbues man, with short hair and a trimmed beard, dressed in formal attire. He wears a collared white shirt, black necktie, black vest, and a black suit jacket. A stylish hat tops his look as he gazes thoughtfully downward. His hands rest casually in his pockets, enhancing his composed and elegant demeanor. The low-key lighting casts soft shadows against a gray studio background, and the visible film grain adds a timeless, classic feel to this upper-body shot
Here are some adjustments I make during inference:
Put trigger word at the beginning of the prompt.
Number of inference steps: I typically use at least 35 steps to ensure quality output.
Guidance scale: I prefer to set it between 2.5 and 3 for the diffusion process. A lower value tends to produce more realistic images.
Seed management: Sometimes, the LoRA may generate images that don’t resemble the subject. In those instances it yields good images, I save combinations of the prompt, parameters, and seed to refine and explore the latent space.
Combining LoRAs: One of the great features of Stable Diffusion models is the ability to combine base models with additional LoRAs to enhance styles, artistic techniques, or poses. When mixing my personal LoRAs with others from platforms like Civitai, I aim to keep their combined strength around 1.2. For example, I’ll use 0.9 for the personal LoRA and 0.15–0.25 for the complementary one, adjusting based on how I want to balance concepts.
That’s all for now! I’m looking forward to applying these LoRAs in more complex workflows using tools like Automatic1111, Forge, or ComfyUI. Currently, the only post-processing I’m doing is some upscaling with the excellent tool provided by magnific.ai. However, setting up a fully functional environment that offers an experience as smooth as Replicate’s playground will be the next step.